Well ahead of its usual schedule, Google has just released the first preview of Android 16. This initial developer preview isn’t meant for the general user, but it’s freely available to anyone who wishes to try it. Here’s what Google Pixel devices can install the Android 16 Developer Preview and how to install it.
Why is the Android 16 Developer Preview available so early?
Google usually releases the first preview of its annual Android release in the first few months of each year, so why is the first Android 16 Developer Preview launching in November?
This is because Google has shifted its schedule, at least for Android 16, to move up the launch considerably. Google has confirmed that Android 16’s initial launch will take place in Q2 2025, a few months ahead of schedule. A minor SDK update, like a “.1” release, will then launch towards the end of 2025.
What Pixel devices are compatible with Android 16?
Google has an industry-leading software commitment on its most recent Pixel releases, but Android 16 hints that it plans to push the envelope on older devices as well. While no devices from before Google’s “Tensor reboot” are eligible for Android 16’s first preview, the Pixel 6 series remains supported.
The full list of Pixel devices compatible with the first Android 16 Developer Preview is as follows:
- Pixel 6
- Pixel 6 Pro
- Pixel 6a
- Pixel 7
- Pixel 7 Pro
- Pixel 7a
- Pixel Tablet
- Pixel Fold
- Pixel 8
- Pixel 8 Pro
- Pixel 8a
- Pixel 9
- Pixel 9 Pro
- Pixel 9 Pro XL
- Pixel 9 Pro Fold
All devices on this list should be getting the full Android 16 update in 2025 when it’s officially released.
Should I install the Android 16 Developer Preview?
Realistically, most people shouldn’t install a developer preview.
This initial release of Android 16 is designed for developers to test their apps on the updated OS version. New features may be live, but most things won’t be, and the experience will likely be fairly unstable. IF you do install, toggle the ability to unlock your bootloader first. It can be a horrible mistake if you don’t. Unless you’ve got a second Pixel kicking around to test it out, you should just wait for the Android 16 Beta program.
Speaking of…
When does the Android 16 Beta start?
Google typically releases 2-3 developer previews in the lead up to a new version of Android. For Android 16, there will be two developer previews released in November and December.
Then, in January, the first of at least four beta releases will arrive ahead of a final release sometime after that.
Android 15 launched for Pixel phones in October, but hit AOSP in September. Looking at Google’s updated timeline, Android 16 is likely to see its final release as early as April, but at the very latest in June. Google says that it expects platform stability by March 2025 with “several months before the official release.”

How to install the Android 16 Developer Preview on Pixel
During the developer preview stage, you can only install Android 16 builds on Pixel devices.
The update requires that you first install the Android 16 Developer Preview 1 build manually via a Factory Image. The Android Beta Program, used for installing beta builds, is not available for Developer Preview builds.
If you are not familiar with sideloading updates manually, we strongly encourage you to wait for the final release. But if you just can’t wait to get your hands on the latest and greatest, here’s how to manually install it.
The “easy” option is to use the Android Flash Tool.
This browser-based tool allows you to sideload factory images from one place. To get started, go to flash.android.com/preview/baklava-dp1. You’ll be prompted to, if you haven’t already, install the Android USB driver. Then, just plug in your device, confirm its connection to the Flash Tool, and select the build you want to install, and you’re off to the races!
If you have not unlocked your bootloader, the tool will walk you through it. But, again, this will reset your device.
How to manually unlock your bootloader
Unlock your bootloader (manually)
On Google Pixel, unlocking your bootloader takes a few steps but, before you take any of them, you need to know that this will factory reset your device.
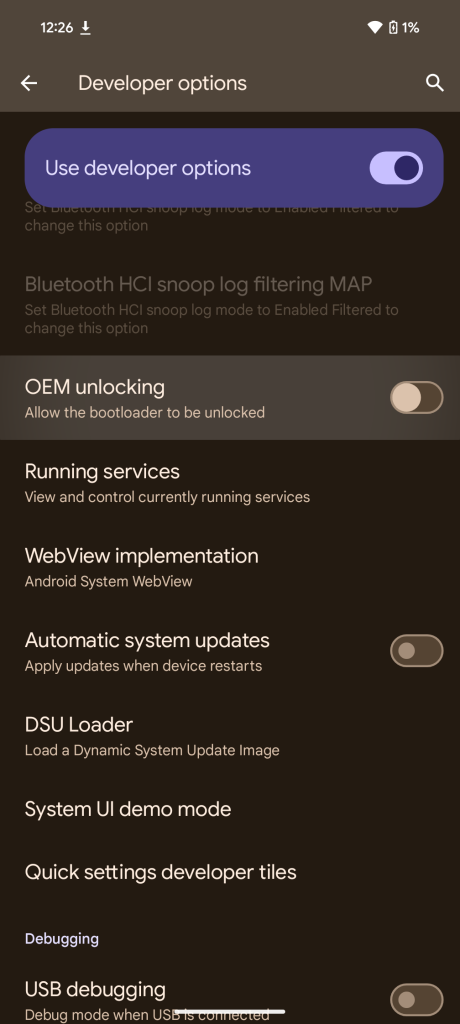
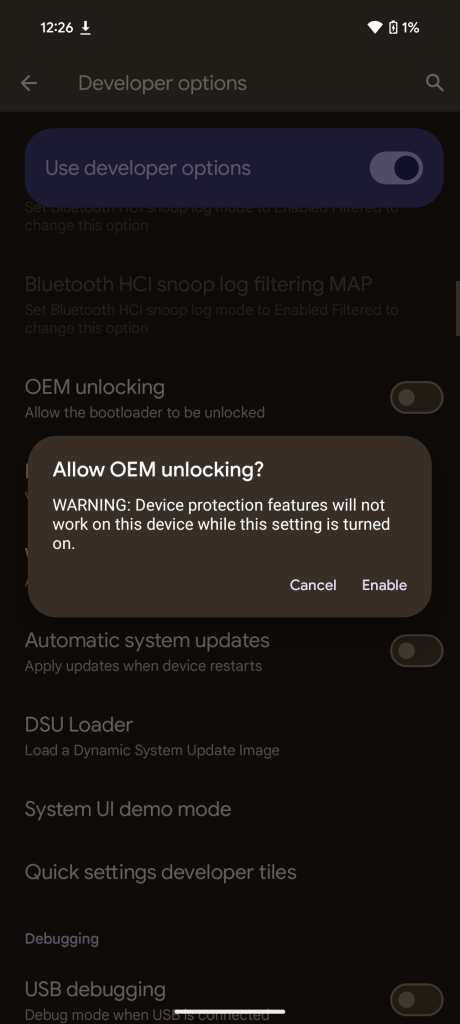
Firstly, you’ll need to enable Developer Options by going to Settings > About phone and tapping on “Build number” repeatedly unless Android asks for your PIN. You can then access Developer Options through Settings > System > Developer options. Scroll down from here slightly and toggle on “OEM unlocking.” You’ll be asked again to confirm your PIN before proceeding.


Again, this will factory reset your device and delete all data.
Your device will then ask you to confirm you want to unlock the bootloader, which will also require that the device undergoes a complete factory reset. These commands will work with any Google Pixel device compatible with Android 16, and it’s a recommended step for installing the developer preview.
How to install the Android 16 Developer Preview manually
- Download Android 16
- Boot into Recovery
- Enable ADB sideload
- Connect to your computer
- Begin sideloading
- Reboot
Download Android 16
To get started, you’ll first need to download the files needed to actually put Android 16 Developer Preview 1 on your Pixel.
There are two ways to do so. First, you can install a Factory Image, which wipes your phone and starts everything from scratch. Alternatively, and the way we’ll detail here, there’s an OTA file, which installs over your current version of Android without wiping your phone. Unlike beta builds, though, you should fully reset your device before installing a developer preview, and unlock your bootloader as detailed above.
You can download the developer preview OTA file from Google. That site contains OTA downloads for sideloading different updates, including the Android 16 Developer Preview, on every Pixel and Nexus device, so you’ll need to scroll down to ensure you are downloading the file that is associated with your device. OTA downloads for Android 16 Developer Preview 1 are provided HERE.
For the Android 16 Developer Preview 1, only Pixel 6/Pro, Pixel 6a, Pixel 7/Pro, Pixel 7a, Pixel 8/Pro, Pixel 8a, Pixel Fold, Pixel 9, Pixel 9 Pro, Pixel 9 Pro XL, Pixel 9 Pro Fold, and Pixel Tablet are available.
You won’t be able to install it on the original Pixel/XL, Pixel 2/XL, Pixel 3/XL, Pixel 3a/XL, Pixel 4/XL, Pixel 4a, Pixel 4a 5G, Pixel 5, or Pixel 5a.
2. Boot into Recovery mode
Next, you’ll boot your Pixel into Recovery mode. To do this, fully power down your handset. Then hold down on the Power button and the Volume down button at the same time until you get to the Bootloader page. You will know you’re in the right place when you see an Android figure lying down on the screen.
Using your volume buttons, scroll down to Recovery mode. Select this by clicking the power button. Alternatively, if you’re already connected to a computer with ADB, you can use the reboot recovery command.
Now, you should see a smaller Android lying down with an exclamation mark over it. From here, press the Power button and the Volume up button for about a second to fully enter Recovery mode. Releasing the Volume up button will send you into Recovery.
3. Navigate to ADB sideload
Using the volume buttons, scroll down to Apply update from ADB and select it with the power button. This will launch a mostly blank screen with text near the bottom directing you on how to sideload an OTA.
4. Connect the handset to a computer with ADB tools installed
This step is important as it’s the only way to transfer the downloaded OTA file to your handset. You’ll need to have ADB and Fastboot tools in a handy place. You can download ADB tools from the Android Developers website. You can also use the Universal ADB Drivers from ClockWorkMod, which can make the process a bit easier on Windows devices.
5. Enter the sideload command
As long as everything is in place, you can now sideload the OTA file. On Windows, ensure your Command Prompt is directed to the ADB tools folder and type in adb sideload. If you’re on macOS or Linux, do the same thing in Terminal (use “cd” and “ls” commands to make sure your Terminal is pointed at the right folder – Google it if you need help) but type in ./adb sideload. You’ll then need to insert the file name of the .zip folder you downloaded from Google and hit enter to start the process.
If everything is working properly, you should see some dialog on your computer and handset that shows the process of the sideload and installation process.
6. Reboot your phone
Once the OTA is done installing, you will be taken back to Recovery Mode. The last step to jump into the new update is to select the Reboot now option with your power button.
Questions? Let us know in the comments.
More on Android 16:
Follow Ben: Twitter/X, Threads, and Instagram
FTC: We use income earning auto affiliate links. More.

