We’re all seeking expert fitness advice without the hefty price tag. Fortunately, Squat University’s Dr. Aaron Horschig has shared three mobility exercises that unlock tight hips, boost flexibility, improve posture and target your whole body, and you don’t have to pay a trainer for the advice, either — we’re re-sharing the moves right here.
Whether you want to improve squat depth or increase flexibility and range of motion, this simple three-move mobility routine works perfectly as a morning wake-me-up or end-of-day wind-down to release tight muscles. And the best part is, it takes less than 10 minutes.
I’ve tried the exercises myself and, alongside Dr Horschig’s commentary, provide some personal advice in addition to the video creator, to help you reap the benefits of each move. My first tip is to pick up one of the best yoga mats for stretching and read on.
What are the 3 bodyweight stretches?
The original content, posted by @Darrenliufitness, has since been published on Squat University’s YouTube channel with Dr. Horschig’s personal take on each exercise, the benefits and modifications he recommends.
1. Child’s pose
A child’s pose is a staple resting posture in yoga but doesn’t just provide an opportunity for rest. The pose targets the upper back and posterior deltoids and, as Dr. Horschig explains, helps develop latissimus dorsi flexibility (the large muscles that run down the sides of your back) and thoracic spine mobility.
It’s also a great opportunity to spend time with your arms overhead, improving posture if you sit for extended periods.
To perform child’s pose:
- Sit with your big toes touching and open your knees to the sides of your mat
- Lower your chest toward the ground, then walk your hands toward the front of your mat and rest your forehead down
- Press gently through your palms and the tops of your feet
- Breathe, and hold.
In coach Liu’s variation, he lifts his palms, rests on his thumbs and index fingers, slightly turns his hands inward, then lowers his hands to the floor again for 10 reps to help activate and rotate the scapula.
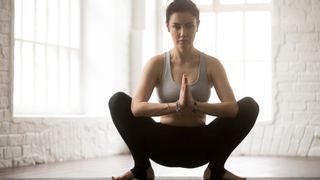
2. Prayer squat

The stretch targets the lower back, hips, knees, ankles and adductors. Like the yogic squat — Malasana in Sanskrit — the deep squat variation develops lower body flexibility, stretching and releasing tightened muscles surrounding the pelvis.
You can hold the stretch or coach Liu demonstrates a more dynamic version, alternating between pressing his hands close together in prayer, then driving his knees outward using his elbows and bringing his fingertips together, opening his palms for 10 reps; this helps you reach deeper into the hips.
If you have a limited range of motion and struggle to keep your heels flat, place a rolled towel or yoga mat beneath them or position a bolster or yoga block beneath your bum.
- Start in a squat with your feet wider than shoulder-width apart and press your feet into the ground
- Lift your chest and lower your bum, then press your palms together in front of your chest
- Keep your back straight without rounding and use both elbows to drive your knees outward.
“People need to spend more time here,” Dr. Horschig says. He advises you to hold onto something sturdy in front of you as you squat (like a pole or squat rack), then pull your hips forward, open your knees and squeeze your glutes. This move also features in one of our recommended routines for sciatica.
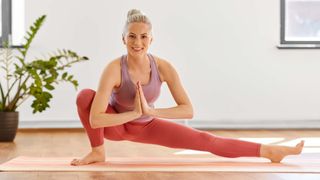
3. Cossack squat

The Cossack squat is one of my favorite lower-body mobility exercises for strengthening the quads, gluteus medius, hamstrings, adductors, lower back and core muscles. You’ll also build a better range of motion in your ankles, knees and hips.
Like the half squat pose — Skandasana in Sanskrit — the deep hip opener is an advanced exercise that takes practice. Coach Liu recommends holding on to something until you feel more comfortable.
He also adds a knee and hip rotation and performs 10 reps per total (5 per side). If this addition is too much, familiarize yourself with the Cossack first, then add the rotations when you feel ready.
- Start with your legs wide and toes pointing forward and extend your arms for balance
- Bend your left knee and sit over to the left (similar to a side lunge), keeping your chest lifted, bum driving downward and right leg straight
- Externally rotate your hip by drawing the toes of your right foot to face the ceiling
- Keep your back straight and left heel planted, pause, then push through your left leg and move to the right side.
Add the rotation at the bottom of the squat by sitting down slowly and keeping your spine tall, then inwardly rotate the bent knee to touch the floor, keeping the opposite leg straight. Re-open the hip by driving the knee outward, then push upward to stand, switching to the other side.
Dr. Horschig recommends a squat rack or similar for support and advises squeezing the glute of the bent leg to help drive the knee outward as you squat. By lifting the foot of the straight leg, you remove slack from the hamstrings and localize the stretch to the adductors (inner thighs).
My verdict on the 3 stretching exercises
Having spent most of my life playing sports, and much of my late teens and early twenties swanning into workouts without a sniff of a warm-up or cool-down, I didn’t learn the benefits of mobility exercises until the injuries began stacking up.
Naturally, you begin to lose some flexibility and range of motion as you age, but adding exercises like these to your routine helps keep you functional and mobile regardless of age and safeguards you from injury. But like anything in life, consistency is key.
I’ve tried and tested each of the exercises above and two of them (Cossack and prayer squat) are staples in my personal routine. Together, they’re three of the best exercises for strengthening your hips, building flexibility and reducing pain over time.
Try to find 10 to 30 minutes several days a week to roll out your mat and give these moves a go. I’ve also included some of the routines I use below if you’re looking for more inspiration.

